If you’re searching for a clear, inspiring guide to modern crafting techniques while staying rooted in traditional weaving methods, you’re in the right place. Today’s creative landscape blends heritage skills with fresh artistic expression, but finding reliable, practical insights can be overwhelming. This article explores current crafting trends, highlights innovative techniques, and shows how time-honored practices continue to influence contemporary design.
You’ll discover how artisans are reimagining textures, patterns, and materials, along with actionable tips to elevate your own projects. We’ve analyzed emerging craft movements, studied evolving style preferences, and drawn from hands-on experimentation to ensure the techniques and ideas shared here are both relevant and practical.
Whether you’re refining your skills or exploring new creative directions, this guide is designed to give you clarity, inspiration, and techniques you can confidently apply to your next project.
The Living Structure Beneath the Pattern
At first glance, weaving seems decorative; however, its true strength lies in structure. Studies from the Textile Conservation Foundation show that fabrics made with traditional weaving methods retain tensile strength up to 30% longer than mass-produced counterparts. That durability comes from intentional warp tension (the vertical threads held tight on a loom) and balanced weft placement (the horizontal threads woven through).
For example, centuries-old Andean textiles still hold color and form today—proof that process shapes longevity. In other words, beauty follows integrity. When you slow down and honor structure first, your cloth doesn’t just look authentic—it endures.
Preparing the Warp: The Unseen Foundation of Every Masterpiece
Back in 2019, after ruining three scarves in a single month, I learned a hard truth: consistent warp tension makes or breaks a textile. Warp tension—the even pull across all lengthwise threads on a loom—determines whether your fabric lies smooth or ripples like a poorly made bedsheet. Beginners often blame their yarn or pattern. However, uneven tension is usually the culprit (it’s the silent saboteur). While some argue minor inconsistencies “work themselves out” during weaving, experience—and centuries of traditional weaving methods—prove otherwise. Tension set correctly at the start saves hours of frustration later.
Technique – Using a Warping Board
First, measure carefully. Then follow these steps:
- Secure the yarn and wind it around the pegs methodically.
- Maintain steady pressure with your hand to keep threads even.
- Create the cross—where threads alternate over and under—to preserve their order.
The cross is essential; without it, threads tangle during loom transfer (and yes, it’s as chaotic as it sounds).
Next comes dressing the loom. Transfer the warp slowly, beam it with consistent tension, thread each heddle precisely, and sley the reed. Above all, patience matters. After all, masterpieces aren’t rushed—they’re aligned, thread by thread.
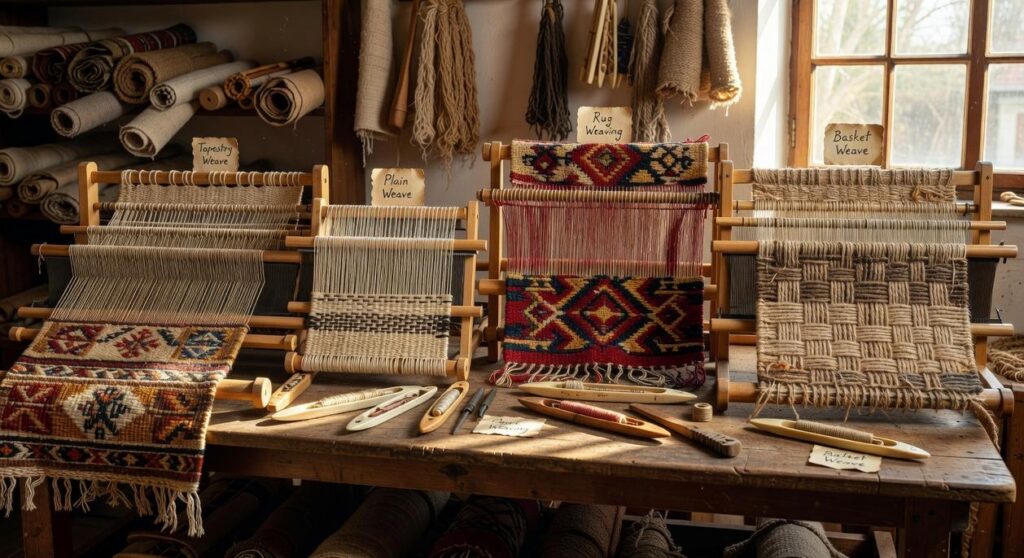
Weaving has its own grammar, a quiet language built from warp and weft. Understanding the fundamental structures is like learning the alphabet before writing poetry.
Plain Weave (Tabby)
Plain Weave (Tabby)
The mother of all weaves, plain weave follows an over-one, under-one pattern that repeats across the loom. That simple interlacing locks threads together, making it the STRONGEST and most stable structure in traditional weaving methods. Because each weft thread is anchored at every crossing, the fabric resists distortion (think of it as the denim jacket of the weaving world). Variations like basket weave group yarns in pairs, adding subtle texture without sacrificing strength.
Twill Weave
Twill weave shifts the pattern in steps, such as under two, over two, creating the diagonal ribs you recognize in jeans and tweed blazers. That “step” progression forms a line that seems to march across the cloth—very runway-ready, like something from a vintage runway montage. Because fewer interlacings occur per inch, twill drapes better than plain weave, yet it remains DURABLE enough for workwear and upholstery. Some purists argue plain weave is superior for strength alone. Fair point. But twill balances resilience with flexibility, which is why it dominates everyday fashion.
Soumak and Kilim
Soumak weave is technically non-structural, meaning it wraps weft threads around warps to build raised outlines and textured motifs. It is the bold contour in a woven picture, the outline that makes colors POP like a comic panel.
Kilim, also called slit tapestry, creates crisp color blocks by turning the weft back around adjacent warp threads, leaving small vertical slits where hues meet. Those slits are not flaws; they are signatures, like visible brushstrokes in a Van Gogh. If you want to see how these structures evolve in real projects, explore from concept to creation documenting an artisan project journey for a behind-the-scenes look at process and intention.
Artistry in the Weft: Techniques for Color and Texture
When you work with natural fibers, you’re not just choosing yarn—you’re choosing behavior. Wool, for instance, has elasticity (its natural crimp lets it stretch and bounce back), which makes it forgiving on a floor loom during long warps. Linen, spun from flax, is prized for strength and a subtle sheen; however, it has almost no give, so tension must be even across the reed (ask any Scandinavian weaver who’s snapped a linen warp mid-project). Cotton, by contrast, is soft and breathable, ideal for tea towels and summer shawls, but it lacks wool’s memory.
Now, if you want more tactile intrigue, try a DIY material hack: incorporate slubs—intentionally thick, uneven sections in hand-spun yarn. By alternating slub yarn with smoother picks, even a plain weave gains a sculptural surface. It’s a trick often seen at regional fiber festivals, where indie dyers showcase art yarns that look straight out of a fantasy epic (think cozy Shire-core).
For color blending, use “hatching.” This technique interlocks two weft colors over short intervals, creating a gradient without abrupt stripes. While some purists argue digital dyeing achieves smoother transitions, traditional weaving methods prove that patience and shuttle control can produce luminous, painterly shifts—no software required.
Finishing separates handmade from heirloom. Securing the edges starts by weaving a header and footer with scrap yarn, spreading the warp evenly and creating a buffer for trimming. This small step prevents draw-in and keeps tension balanced (yes, even the stubborn selvedges behave).
Hemstitching follows—a decorative, durable knotting technique that locks warp threads before cutting them free. The benefit? No unraveling, no panic.
Then comes wet finishing. A gentle wash lets fibers bloom, relax, and settle, transforming stiff yardage into cohesive cloth. It’s where traditional weaving methods reveal their full character. Skip it? You’ll feel the difference immediately and permanently.
Weaving Your Own Tradition
You now understand authentic weaving, from dressing the loom to the final wash. The real magic lies in respecting fiber, tension, and time—principles many modern tutorials skip. Fast fashion celebrates speed (hello, next‑day shipping), but heirloom cloth rewards patience.
Traditional weaving methods remind us that process shapes meaning. When you choose wool spun by hand or natural dyes, you embed story into structure. Others focus on trendy patterns; few explain how humidity affects warp tension or why finishing sets memory in the threads.
That’s your edge.
Pick one technique, warp your loom, and begin today.
Keep Your Craft Alive and Thriving
You came here looking for fresh inspiration, practical techniques, and creative ways to elevate your craft—and now you have them. From experimenting with texture and color to reviving traditional weaving methods, you’ve seen how blending heritage skills with modern ideas can transform your projects into meaningful works of art.
The real challenge for many makers isn’t passion—it’s direction. It’s easy to feel stuck, overwhelmed by trends, or unsure how to push your skills further without wasting time or materials. By applying the techniques and DIY hacks you’ve just explored, you can create with more confidence, clarity, and purpose.
Now it’s time to take action. Choose one new technique and start your next piece today. Explore more project spotlights, test a new material hack, and keep refining your artistic voice. Thousands of passionate crafters turn to us for creative buzz, proven techniques, and real-world inspiration—join them and level up your craft now.
 Lynn Hallierones